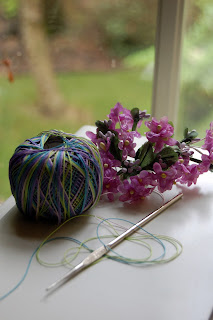
For this hat, this is all you need! I'm making a tiny hat for a a little fairy friend, but if your fairy is bigger than mine, you can certainly use a bigger thread and a bigger hook! This is a size 20 thread with a size 6 hook. I'm using Lizbeth threat which I really love! The flowers are just tiny silk flowers used for hats, weddings, and trims of all kinds.
Start with a "magic circle." If this is an unfamiliar term, go to YouTube and there are lots of folks that will show you just how to make one! Single Crochet 6 times into the circle and then tighten the loop. In the next row, chain one and make two single crochets in each single crochet! You'll have 12 single crochets when you finish the second round!
Keep making rows until the hat is the right size for your fairy! Sorry the photos aren't better, but I'm holding the camera with one hand and the teeny hat with the other!! Be sure to fit to your fairy until your hat is the right size! You won't need to put two single crochets in each stitch - just add the second single crochet when needed to have a rather flat circle.
Ok! this is the important design feature to get the little pointy front on your hat. Half way around your row, single crochet, double crochet and single crochet into the next stitch. Then, keep single crocheting in each stitch around. For my tiny fairies, I add one more round - a single crochet in each stitch. If your fairy requires more rows, adjust appropriately!
When you do that final row in single crochet - without adding two single crochets in any stitch which keeps the shape flat - the shape of your little hat will curve under.
If you've left the beginning thread, you can add dangle beads onto it. If you don't want to do this, just weave it into your hat and snip off the excess.
Now, snip off two flowers from your bunch. The ones I'm using were found at Michaels in the bridal department. Poke the end of the stem through the hat and add just a tiny bit of glue to the underside of the flower. Hold it in place until the glue sets.
Then add the second flower to the other side of the hat! A bit of tacky glue will hold it nicely. Once the flowers are nicely stuck in place, just clip the stems from the underside.
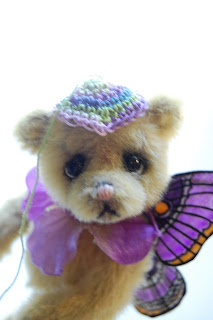
I am appreciative to Guillian - this tiny fairy bear for modeling for me - especially because he says he doesn't care for flowers on his hats. Please email me if you have any questions! You can use all kinds of flowers on this little base as well as a bow of silk thread. I came up with this base as a way to let tiny bears have hats when no commercial base was available. Keep your eyes open for beautiful flowers.
One of Diana's little hats has just one rose and a beautiful bow of green silk ribbon on the back.
Spring's little hat had lots of flowers! And she had a matching purse. I'm not sure that fairies carry purses. Does anyone know??


